Shimming your Metabones CINE Smart Adapter
I’ve been a long time Metabones customer. I purchased my first Smart Adaptor (the MK2, which I still own) back in 2012 to use on my Sony FS100 and Sony NEX5. I’ve also owned various versions of their Speed Boosters (Nikon to MFT, Nikon to BMCC, Nikon to BMPCC, Canon to BMPCC, Canon to E Mount) and some of their “Dumb” Adaptors (Nikon G to MFT, Nikon G to E Mount) over the years.
Metabones build quality has always been pretty solid and they has been my “goto” adaptor and ones that I often recommend when anyone asks.
Until recently I was using the “EF – E Mount T Smart Adapter (Mark IV)” but I sold that after buying the Sigma MC11 as most of my EF glass is from Sigma and I get much better AF performance with the MC11 on the A7RII and A6300.
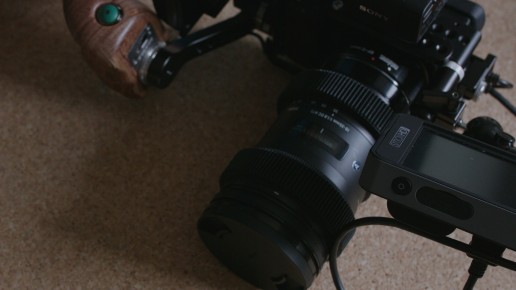
With the launch of the new CINE Series mounts I thought I’d grab one to use on my Sony PXW-FS5 as I love the idea of locking my lens in place and having better manual focus control. Locking the mount and the lens means there is no play in the lens when you are pulling focus. This is a real issue when using “stills” lenses.
So I ordered a “Canon EF Lens to Sony E Mount T CINE Smart Adapter” and when it arrived I ran a few tests and I was a little disappointed to find the following issue: With the Sigma MC11, my Sigma 18-35 f1.8 is Parfocal. It holds focus throughout the zoom range. With the Metabones “Canon EF Lens to Sony E Mount T CINE Smart Adapter” it does not hold focus. I remember that this was also the case with the “EF – E Mount T Smart Adapter (Mark IV)”.
So I checked the flange focal distance (FFD) of the adaptors and here is what I found:
Sony E Mount FFD is 18mm.
Canon EF FFD is 44mm.
This means the adaptor needs to be 26mm to fill the gap.
When I measure, with a vernier calliper, the Sigma MC11 it is spot on 26mm. As it should be.
When I measure the Metabones EF – E Mount T Cine Smart Adaptor is reads 25.9mm. So it’s out by 0.1mm.
That’s a pretty big difference with it comes to lens mounts an is enough to cause any parfocal lens to shift focus as you zoom.
Why is this? Seems silly to have a Cine mount that locks the lens in place but is not accurate for focus work. If the mount and adaptor were old I could understand it being out by that much due to wear and tear but this is a new adaptor.
So I contacted Metabones Support. After a week I’d heard nothing back. So I though “Can I shim the mount to correct this?”
Looking at the adaptor, the front mount plate seemed the best option to shim. So I removed it to have a look how it was assemble. What I found was a pretty simple design that looked easy to shim and as it turned out it was and the result was I was able to correct the FFD and the Sigma 18-35 is now parfocal again.
Below are the steps I took (warning, this may void your warranty and you follow these steps entirely at your own risk).
Things you’ll need:
1.5mm hex key (normally supplied with the adaptor)
Craft knife or scalpe blade
Cutting mat
Hole punch or sharp point (a small Phillips screw driver will do)
Strong film to make the shim from (I used so lighting gel)
Step 1
Remove the 5 screws from the front of the mount with a 1.5mm hex key and carefully lift out the mount plate. Careful not to drop the small spacers that support the mount. Leave them inside the adaptor.
Step 2
Now over to the cutting mat use the mount plate as a template to cut your shim from the film. I used some lighting gel film.
Step 3
Cut your shim to match the front plate. In my case I cut 2 to get the right thickness.
Step 4
Once you have the shims cut you’ll need to make holes for the screws. Best is to use a hole punch tool or a sharp point but a small Phillips head screwdriver will also do the trick.
Step 5
Now inset the screws through the mount and the shims. As the holes in the shims are tight they should hold the screws in place and the shims should align nicely.
Step 6
Carefully flip the mount plate over and align the screws with the holes in the supports inside adaptor. Tighten all the screws with the 1.5mm hex key alternating sides as you do so.
That’s it. Now test to see if you have shimmed it enough.
As with any mount over time the mounting and un-mounting of lenses will cause wear and tear and the accuracy of the mount will start to drift so you might need to re-shim the mount in the future. Now you know how.
Hope that’s been of some help.
Rigging your Sony A6300
I’ve been shooting with Sony mirrorless/E mount systems since the release of the Sony NEX5. A lot has changed since then and there are so many more options available today. Over the past few years I’ve shot on many of those options including the Sony FS100 and FS700, the Sony A7 Series and even the Sony FS5.
Since the release of the Sony A6300 this little camera has become my goto camera for corporate doco work where I need to travel super lightweight. I thought I’d share how I rig this camera for that use as well as how it can be rigged for use on a gimbal, like the DJI Ronin.
The core of my rig is based around the Small Rig 1661 cage. As full disclosure, I was one of a few people who give Small Rig feedback on the original cage and some of my requests were included in the new cage. Small Rig supplied me with the new cage. I’m not paid by Small Rig and all other parts have been purchased, and are currently being used, by myself. I don’t recommend products I’m not happy to use myself.
I’ve created a shopping list with notes if you are looking to pick-up any of the parts:
View list on Amazon UK
View list on Amazon US
The parts are also available direct from Small Rig.
The monitor I’m using is the smallHD 501, the wooden handle is from Tilta, wireless follow forces is the Lenzhound from Motion Dogs and the bag is the LowePro ProTactic 350 AW which is perfect as a carry on bag even with regional / budget airlines.