Blackmagic Film to Video plugin by Antler Post
Over the last few weeks I've been beta testing a Final Cut Pro X plugin developed by Nick Shaw over at Antler Post-Production Services.
The plugin is a great workflow tool for Final Cut Pro X (FCPX) users who are working with footage from the Blackmagic Cinema Camera (BMCC) that will be delivered to television.
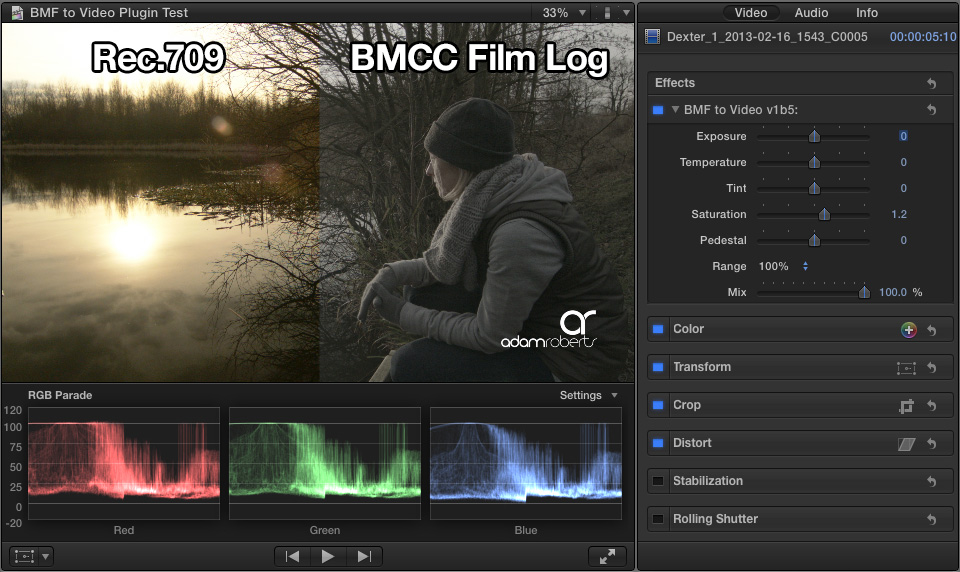
It started out as a simple tool for viewing Apple ProRes Film Log footage from the Blackmagic Cinema Camera as Rec.709. This is very similar to Nick's popular plugin for for viewing ARRI ALEXA LogC footage as Rec.709 in the Final Cut Pro 7.
As it's been developing Nick has added a few really useful features that make this plugin worthwhile owning for anyone working with footage from the BMCC.
In it's simplest application the plugin applies the same Rec.709 LUT that is available in DaVinci Resolve to your ProRes Film Log footage. All without leaving your FCPX timeline.
In addition to this Nick has included a few simple sliders that give you some added control and speed up your workflow. Many of these adjustments can be done with the built in Colour Correction tools in FCPX but it's handy to have all these controls in one place and they are really simple to use.
First off there is an Exposure slider the lets you simply fine tune the overall exposure.
Next up are the Temperature and Tint sliders. These are very useful as the BMCC does not have a way to set the white balance manually. You only have 6 presets to chose from (3200K, 4500K, 5000K, 5600K, 6500K and 7500K). With these 2 sliders you can make the fine adjustments you might needed to get the colour balanced spot on.
Next we have the Saturation slider. Applying a straight Rec.709 LUT on you Log footage can sometimes produce results that are to saturated or in some cases not saturated enough. This is a nice simple way of finding your preferred look.
Next is the Pedestal slider. This is for fine tuning your black point without changing your exposure. If you have adjusted your exposure you may find your black have become to crushed or they have lifted to much. This slider lets you put you black levels back where you want them.
The Range options lets you select 100% (Broadcast Safe as Resolve would do the conversion) or 109% (as the camera shoots Video mode and similar to how many Sony cameras capture their image).
The last slider is the Mix slider. Its simply lets you mix your results with the original Log footage. Many people like the milky look of Log footage and often only want to make slight adjustments. This can be useful for those that are looking for something between Rec.709 and Log.
Watch the whole film above for samples of footage with the plugin applied.
IMPORTANT NOTE:
There is a serious bug in FCP X, which causes random flash frames in renders. Adjusting any parameter, or deleting a render file, will make FCP X re-render, and may remove the flash frame. Or, since it is an intermittent bug, it may just cause it to appear on a different frame. Although this bug was widely discussed after the release of FCP X 10.0.6, Apple did not include a fix in the 10.0.7 update. The only known work around is to render your final file in Compressor 4.
Notes on software versions:
Antler BMF to Video Plugin - v1b5
Blackmagic Cinema Camera firmware - 1.2
Apple Final Cut Pro X - 10.0.7
Apple Compressor - 4.0.6
Lenses and Equipment used:
Tokina 11-16mm f/2.8 AT-X (Nikon mount) with Novoflex adaptor
Canon EF 24-105mm f/4L IS USM
Light Craft Workshop Fader ND MK II
For more info contact Nick Shaw over at Antler Post-Production Services.
Music by Steve Tait - used with permission.
A Workflow for AVCHD in FCPX and Resolve

With Blackmagic Design DaVinci Resolve 9 Lite being free and a really powerful grading tool, many users are trying it out. It makes a great companion to Apple Final Cut Pro X and is really easy to move files between both applications via XML.
Some however, are finding it performs really badly with AVCHD files.
When you import AVCHD files, like those from the Sony NEX-FS100 / 700, FCPX creates ProRes Proxy files in the background. FCPX then uses those files in the timeline, so you are not actually editing with the AVCHD file but rather the proxy.
When you export you project to Resolve, the XML is linked to the original AVCHD files (that are now in a Quicktime wrapper). While Resolve can read these files it is painfully slow. Too slow to be of any real use.
You can get a smooth working process in Resolve from FCPX with AVCHD though.
Here is a simple workflow:
In FCPX select your Event containing your clips. Select "File/Transcode Media..." and then select "Create optimised media". Let FCPX do it's thing. FCPX is now transcoding the AVCHD files to ProRes 422.
Now export you project XML file.
Now launch Resolve. In the Media panel browse to your Final Cut Events folder. Find the Event folder for your project, inside it you'll see a folder called "Transcoded Media" in there you'll find 3 folders, open "High Quality Media". Select all the files, right click and select "Add to Media Pool".
Now move to the Conform tab and import the FCPX XML file and uncheck "Automatically import source clips into media pool".
Resolve will use the files already in the Media Pool, which are high quality ProRes 422 files, rather than the original AVCHD files. Things should run a lot smoother.
Happy grading.


